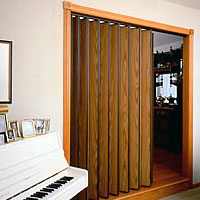
https://urbanmodernhardware.com is a supplier of American-made accordion doors, a special type of door that folds in, saves space, and can be highly portable. They have various uses: beautify a space, make operation easy, prevent sound leakage, provide privacy, and even secure a spot.
There are a variety of different products that fall under the category of accordion doors, and many of them are for different specialized applications. They’re available in many finishes, and they can be found for purposes as small as a home closet door, to massive openings for commercial spaces – often requiring custom, made-to-order solutions.
The one big thing to think about is: what is the quality of what you’re getting? How long is it going to last you? Home Depot and Lowes sell numerous accordion doors at their department stores, but seeing as they’re like more of a Walmart from hardware, you don’t want to buy something that breaks down 30, 20 or even 10 years later on. It is a must to invest in a long-lasting accordion door upfront – and Accordion-Doors.com has the expertise to carry not only the most trustworthy brands, but advise you exactly on what to buy for your application, and how to buy it.
Here are the different brands of accordion door:
Woodfold
Woodfold Manufacturing makes all-purpose accordion folding doors for easy access to spaces of nearly any size, small or large. They have durable, smooth hinges, and many of their doors have been successfully tested for ADA compliance.
The 140 and 220 series accordion doors are excellent smaller residential options. The 140 is best used as a closet door for retirement homes, assisted living facilities, hospitals, and dorm rooms. The 220 is an efficient room divider, helping property owners conserve on A/C costs by more effectively regulating temperature.
The 240 series is larger, and can even function as an instant wall or door – easily opening and closing to either form or remove a large division. From here on out, Woodfold has a variety of custom-made accordion doors for commercial purposes, some of them acoustic-lined and perimeter-sealed to insulate sound.
Accordion-Doors.com’s resident accordion door experts have extensive experience with customizing Woodfold doors for customers.
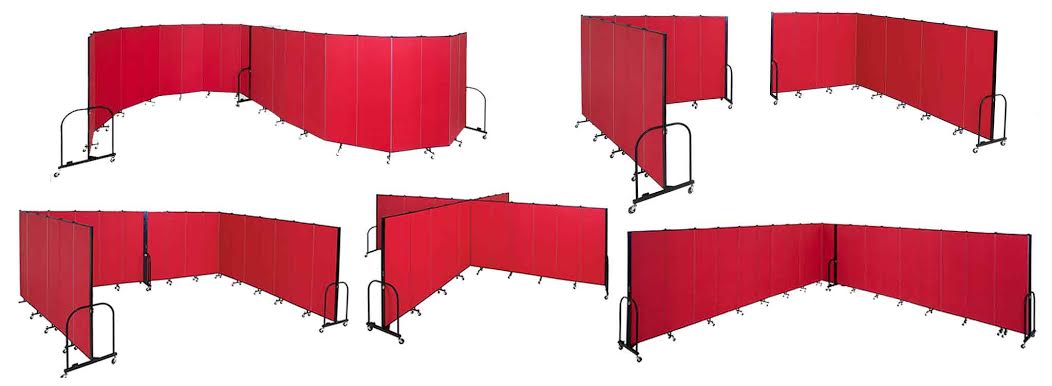
Screenflex
Screenflex partitions are among the most portable kind of accordion-style doors: they’re on wheels! You can easily take them with you anywhere you want, and they come in various styles to suit your needs.
Portable partitions are used for studying, classroom education (they make one that functions as a whiteboard), display towers for art installations, room dividers (whether temporary or not), and more.
Acoustic Accordion Doors
These are the doors that are designed with the specialized intent of maximum sound insulation. There are two main brands that manufacture these:
Curtition
Curtition acoustical vinyl doors are an economical and long-lasting solution for sound insulation. Which one of their doors is best for you depends on how much sound you need to filter out. The MK-XX series doors are designed for minimal sound insulation, such as in schools and hospitals, where the only main need is visual separation. Meanwhile, at the high end, the VL8 is designed for maximum sound attenuation in high-noise areas.
TranZform
TranZform doors are multi-function doors: they’re flexible, they’re tough, and the highest-end at insulating sound. They are most useful for partitioning and dividing large rooms in commercial spaces.
Security Doors
Mobilflex manufactures a variety of security closures for retail shops that need to close off their space after business hours. From basic doors that provide a see-through view, to totally opaque accordion doors that keep out prying eyes from high-security facilities, they have the solution you need to maintain industry-best security in your commercial space.
Don’t miss out on an accordion door supplier with the best products and the customer service to match. You can reach them at Specialty Doors today.
The most important factor that determines whether a person is can procure a loan for himself or not is the fact, whether is past credit history is stable enough or not. All factors depend on his past record of handling credits. A bad credit history implies that his appeal for a loan would be rejected and won’t be met in most of the places. And the worst part is that, if the concerned individual in his past has ever been declared as bankrupt or had a foreclosure, then for sure the borrower would face difficulties when he tries to get a financing for a home mortgage purchase, home equity or second mortgage loan. But the gab that home loans are not available for people with bad credit history is just a baseless myth. Since these loans are available to people with bad credit history too. The way however to find such a kind of loan, however is to be to be persistent in looking out for such kind of loans, because there are home mortgage loans for people with bad credit. FHA Loans Florida!
The basic problems involving, the process of procuring loan arises from the activities of sub-prime lenders. These are those lenders who actually work really hard for fetching loans for the people with bad credit background and low credit score and then the charge absolutely unreasonable price for the job. Borrowers should be careful of borrowing money from sub-prime lenders, as they can charge high interest rates which, comparatively are too high than the market rate. Not only this, but these lenders also charge unreasonable pre-payment penalties. Online articles are posted in websites to inform the borrowers about their existence and caution them. However, it’s not absolutely impossible to find lenders who give out loans at reasonable rates and agreeable charges, to people who have a bad credit history. All a borrower needs to do is look around and talk to different mortgage brokers, which would prove to be helpful to find a lender, that can get them an approved loan with a reasonable interest rate and fair terms of repayment. USDA Loan Florida!
Things that the borrower, should make sure about, are that he makes use of the lowest interest rate and terms possible. Specially a borrower with a bad credit history and bad credit score should make sure that he sends application for loans to a number of different lenders, since it would be sensible for him to make comparison between different mortgage loan quotes, so that he makes sure that he chooses the best one. Requirements for FHA!
Siphon is the process by which a sewage pipe is used to suck out the accumulated debris within a sewer line. Some areas do not have the capability to purchase,install,and maintain Siphon Systems on their sewers. Hence,it is important to be able to repair sewer lines in order to keep from unnecessary disruptions. It is usually best to try and minimize disruptions as much as possible. Reconditioning a sewer line is often the best alternative for fixing problems that arise due to excessive clogging or clog building.
-
Siphon can be used to clean a sewer line. Most of the time,since this is used in combination with other maintenance techniques such as aeration and deionization,the repairs required are much less than that required when only one of these techniques is used. This is due to the fact that the mechanical processes involved in the other methods are normally the cause of the sewer line clogging,which in turn causes increased clog building. The sump pump can be an excellent choice for reducing line maintenance costs. This is because it is far more cost-effective,especially when compared to purchasing,installing,and maintaining the other maintenance methods. You can even have the ability to divert any excess flow back into the line.
-
Siphon line repair can be done using a sump pump,but it is important to note that this does not happen all the time. Usually the treatment or flushing of the sewage lines will clean the clogs. You can also use more advanced tools to cure the clogs. The main reason for sewer line repairs is to prevent water from accumulating and then eventually clogging the sewer line. Most of the time,the clogs are caused by excessive build up of organic matter in the system which is usually removed using a machine known as a sump dredge.
The following is a range from absolutely no to 10 detailing a series of “danger/ return profiles,which can be made use of as a overview to recognize your very own danger/ return account.
Zero`Security of funding is only concern most of all various other considerations. Gotten ready for inflation to erode funding. No danger acceptable and also not seeking to relocate investment settings. Seeks government guaranteed and also huge institutional income-based investments only.
1. Extremely conservative,security of funding is prime concern. Seeks much better than many standard return but danger account to stay really low. Additionally looks for government and also semi-government income investment but will likewise invest in financial institutions,pleasant societies and also various other income based non government assets.
2. Traditional but likewise worried concerning tax obligation and also inflation. Looks for a well balanced portfolio which enables some funding growth. Will invest in insurance coverage and also various other institutional investment took care of funds giving funding growth and also income. Prefers a very conservative mix.
3. Traditional capitalist prepared to shield themselves against inflation and also taxes where possible. Will invest in a well balanced portfolio of taken care of funds,term deposits,some share market based investments and also will think about some residential or commercial property based assets.
4. Modest capitalist prepared to approve some originalities and also carry out pro-active monetary preparation to shield assets from tax obligation and also inflation. Income demands provided top priority with the equilibrium of assets devoted to funding growth. Will invest in a equilibrium portfolio of shares,residential or commercial property,took care of funds and also income investments.
5. A common capitalist seeking a broad investment spread that is heavy towards growth assets. Seeks approaches to shield assets from taxes and also to expand at the very least greater than the rate of inflation. Prepared to approve short term volatility in return for longer term funding growth. Will participate in some asset tailoring consisting of residential or commercial property and also margin financing. Seeks recurring partnership with monetary expert.
6. Prepared to be more hostile with part of the portfolio to enhance overall investment performance. Will gear to spend,and also look for added performance via wrap financing,co-developer financing,and also will likewise look for to shield share portfolio via alternatives approaches.
7. Concerned to gather a significant asset portfolio. Requires recurring engagement with monetary preparation. Will make use of household counts on and also self took care of superannuation funds to assist in tax obligation preparation and also will carry out whatever added tailoring is required to build asset base. Is likewise prepared to time markets and also change assets to maximise investment returns.
Adhere To John Sage Melbourne for more experienced residential or commercial property investment advice.
8. Prepared to take an active or hostile hands-on technique to build assets promptly. We approve greater volatility and also what ever tailoring offered to boost investment returns.
9. A reasonably speculative capitalist interested in added assets outside of standard asset courses. Interested in securing assets from tax obligation consisting of overseas counts on if needed,and also will invest in share alternatives and also futures agreements. Is seeking a private financial and also individual investment technique that increases returns.
10. A speculative capitalist seeking to maximise short term returns. Will trade volatility on the monetary money markets,carry out high return mezzanine growth financing,and also aggressively look for to minimise tax obligation legally.
To find out more concerning developing your riches mindset,visit John Sage Melbourne right here.